Vision language model with structured output(1)
The first stuff we need to do is configure conda environment, let’s have an overall process record:
- conda init: to activate the conda.
- conda create -n envname python=3.11: create our conda environment.
- pip install outlines : install outer libraries
- git clone https://hf-mirror.com/liuhaotian/llava-v1.5-7b sudo apt-get update sudo apt-get install aria2 pip install -U huggingface_hub wget https://hf-mirror.com/hfd/hfd.sh chmod a+x hfd.sh export HF_ENDPOINT=https://hf-mirror.com ./hfd.sh liuhaotian/llava-v1.5-7b --tool aria2c -x 8 : download llava model and then waiting. Remember export HF_ENDPOINT=https://hf-mirror.com is necessary!!!
- pip install transformers accelerate pillow rich
- pip install flash_attn-2.7.3+cu11torch2.6cxx11abiFALSE-cp311-cp311-linux_x86_64.whl : install flash_attn by downloading it to local directory
And there is still one thing I want to emphasis: we need to put the test.py in the same level of file system with model folder, it look like this: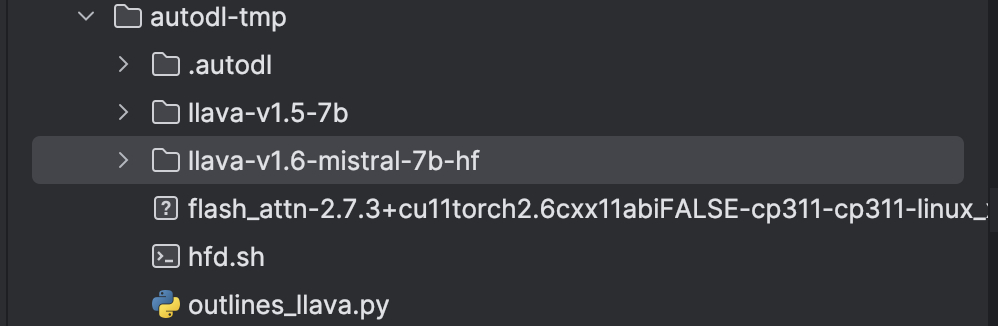
It is unavoidable to download weight files from HuggingFace, however, HuggingFace has banned the visiting from China and in the server, we can not use VPN to get access. So we need to do something to solve this problem.
Solution: download the weight files with HF.mirrors. This is absolutely same as HuggingFace and is made by Chinese great programmers.
For example, if we want to download Vicuna-7b model from HuggingFace, we can run the following command:
- git clone https://hf-mirror.com/lmsys/vicuna-7b-v1.3
- ./hfd.sh lmsys/vicuna-7b-v1.3 –tool wget
The downloading process will be slow, depend on the server Wlan condition. And after the downloading process, we handle the problem.
conda create python=3.10
install outlines,transformers,torchvision pillow
download flash_attn-2.7.3+cu11torch2.6cxx11abiFALSE-cp310-cp310-linux_x86_64.whl from flash-atten official website
git clone https://hf-mirror.com/llava-hf/llava-v1.6-mistral-7b-hf
pip install -U huggingface_hub
wget https://hf-mirror.com/hfd/hfd.sh
chmod a+x hfd.sh
export HF_ENDPOINT=https://hf-mirror.com
安装aria2:
sudo apt-get update
sudo apt-get install aria2
./hfd.sh llava-hf/llava-v1.6-mistral-7b-hf –tool aria2c -x 8
safetensors_rust.SafetensorError: Error while deserializing header: HeaderTooLarge
solution:
huggingface-cli repo-info llava-hf/llava-v1.6-mistral-7b-hf –files –filter “*.safetensors”
LLaVA with outlines:
The code given by Outlines official document are to some degree wrong, we should correct it to:
import torch
import outlines
from transformers import LlavaForConditionalGeneration
model_name=”llava-v1.6-mistral-7b-hf” # original magnet model is able to be loaded without issue
model_class=LlavaForConditionalGeneration
def get_vision_model(model_name: str, model_class):
model_kwargs = {
“torch_dtype”: torch.bfloat16,
“attn_implementation”: “flash_attention_2”,
“device_map”: “auto”,
}
processor_kwargs = {
“device”: “cuda”,
}
model = outlines.models.transformers_vision(
    model_name,
    model_class=model_class,
    model_kwargs=model_kwargs,
    processor_kwargs=processor_kwargs,
)
return model
model = get_vision_model(model_name, model_class)
Then it has a wrong:
ValueError: Using a device_map, tp_plan, torch.device context manager or setting torch.set_default_device(device) requires accelerate. You can install it with `pip install accelerate’
After I pip install the required accelerate library, I run the code again, it report the problem:
safetensors_rust.SafetensorError: Error while deserializing header: HeaderTooLarge
And I find something weird when I look though my file system:
But in the outer folder, the .safetensors files’ size are very small, only 4k, in the inner folder the .safetensors are actual size show in the Hugging face. Then I copy the big .safetensor to the outer folder.
I rerun the code, and find that the problem has been solved. This problem has troubled me a a long period. Haha, I solve it!
Then I write the entire code from the official document, we encounter 2 problem:
ImportError: cannot import name ‘StrEnum’ from ‘enum’ and from datasets.fingerprint import Hasher ModuleNotFoundError: No module named ‘datasets’
We can solve the first problem by replace “from enum import StrEnum” with
“import enum
class StrEnum(str, enum.Enum):
pass”
Then we can solve the second question by pip install datasets.
We then test Qwen there:
./hfd.sh Qwen/Qwen2-VL-7B-Instruct –tool aria2c -x 8
After that, we encounter a problem:
AutoVideoProcessor requires the Torchvision library but it was not found in your environment. Check out the instructions on the
installation page: https://pytorch.org/get-started/locally/ and follow the ones that match your environment.
Please note that you may need to restart your runtime after installation.
pip install torchvision, but there we need to specify version of it. We need to install the verison adhere to torch=2.6.0. Thus we have: pip install torchvision=0.21.0
And after that, we can run the receipt_outlines.py. This program is to describe the information such as single price and tax. And the result are like this:
Original image: 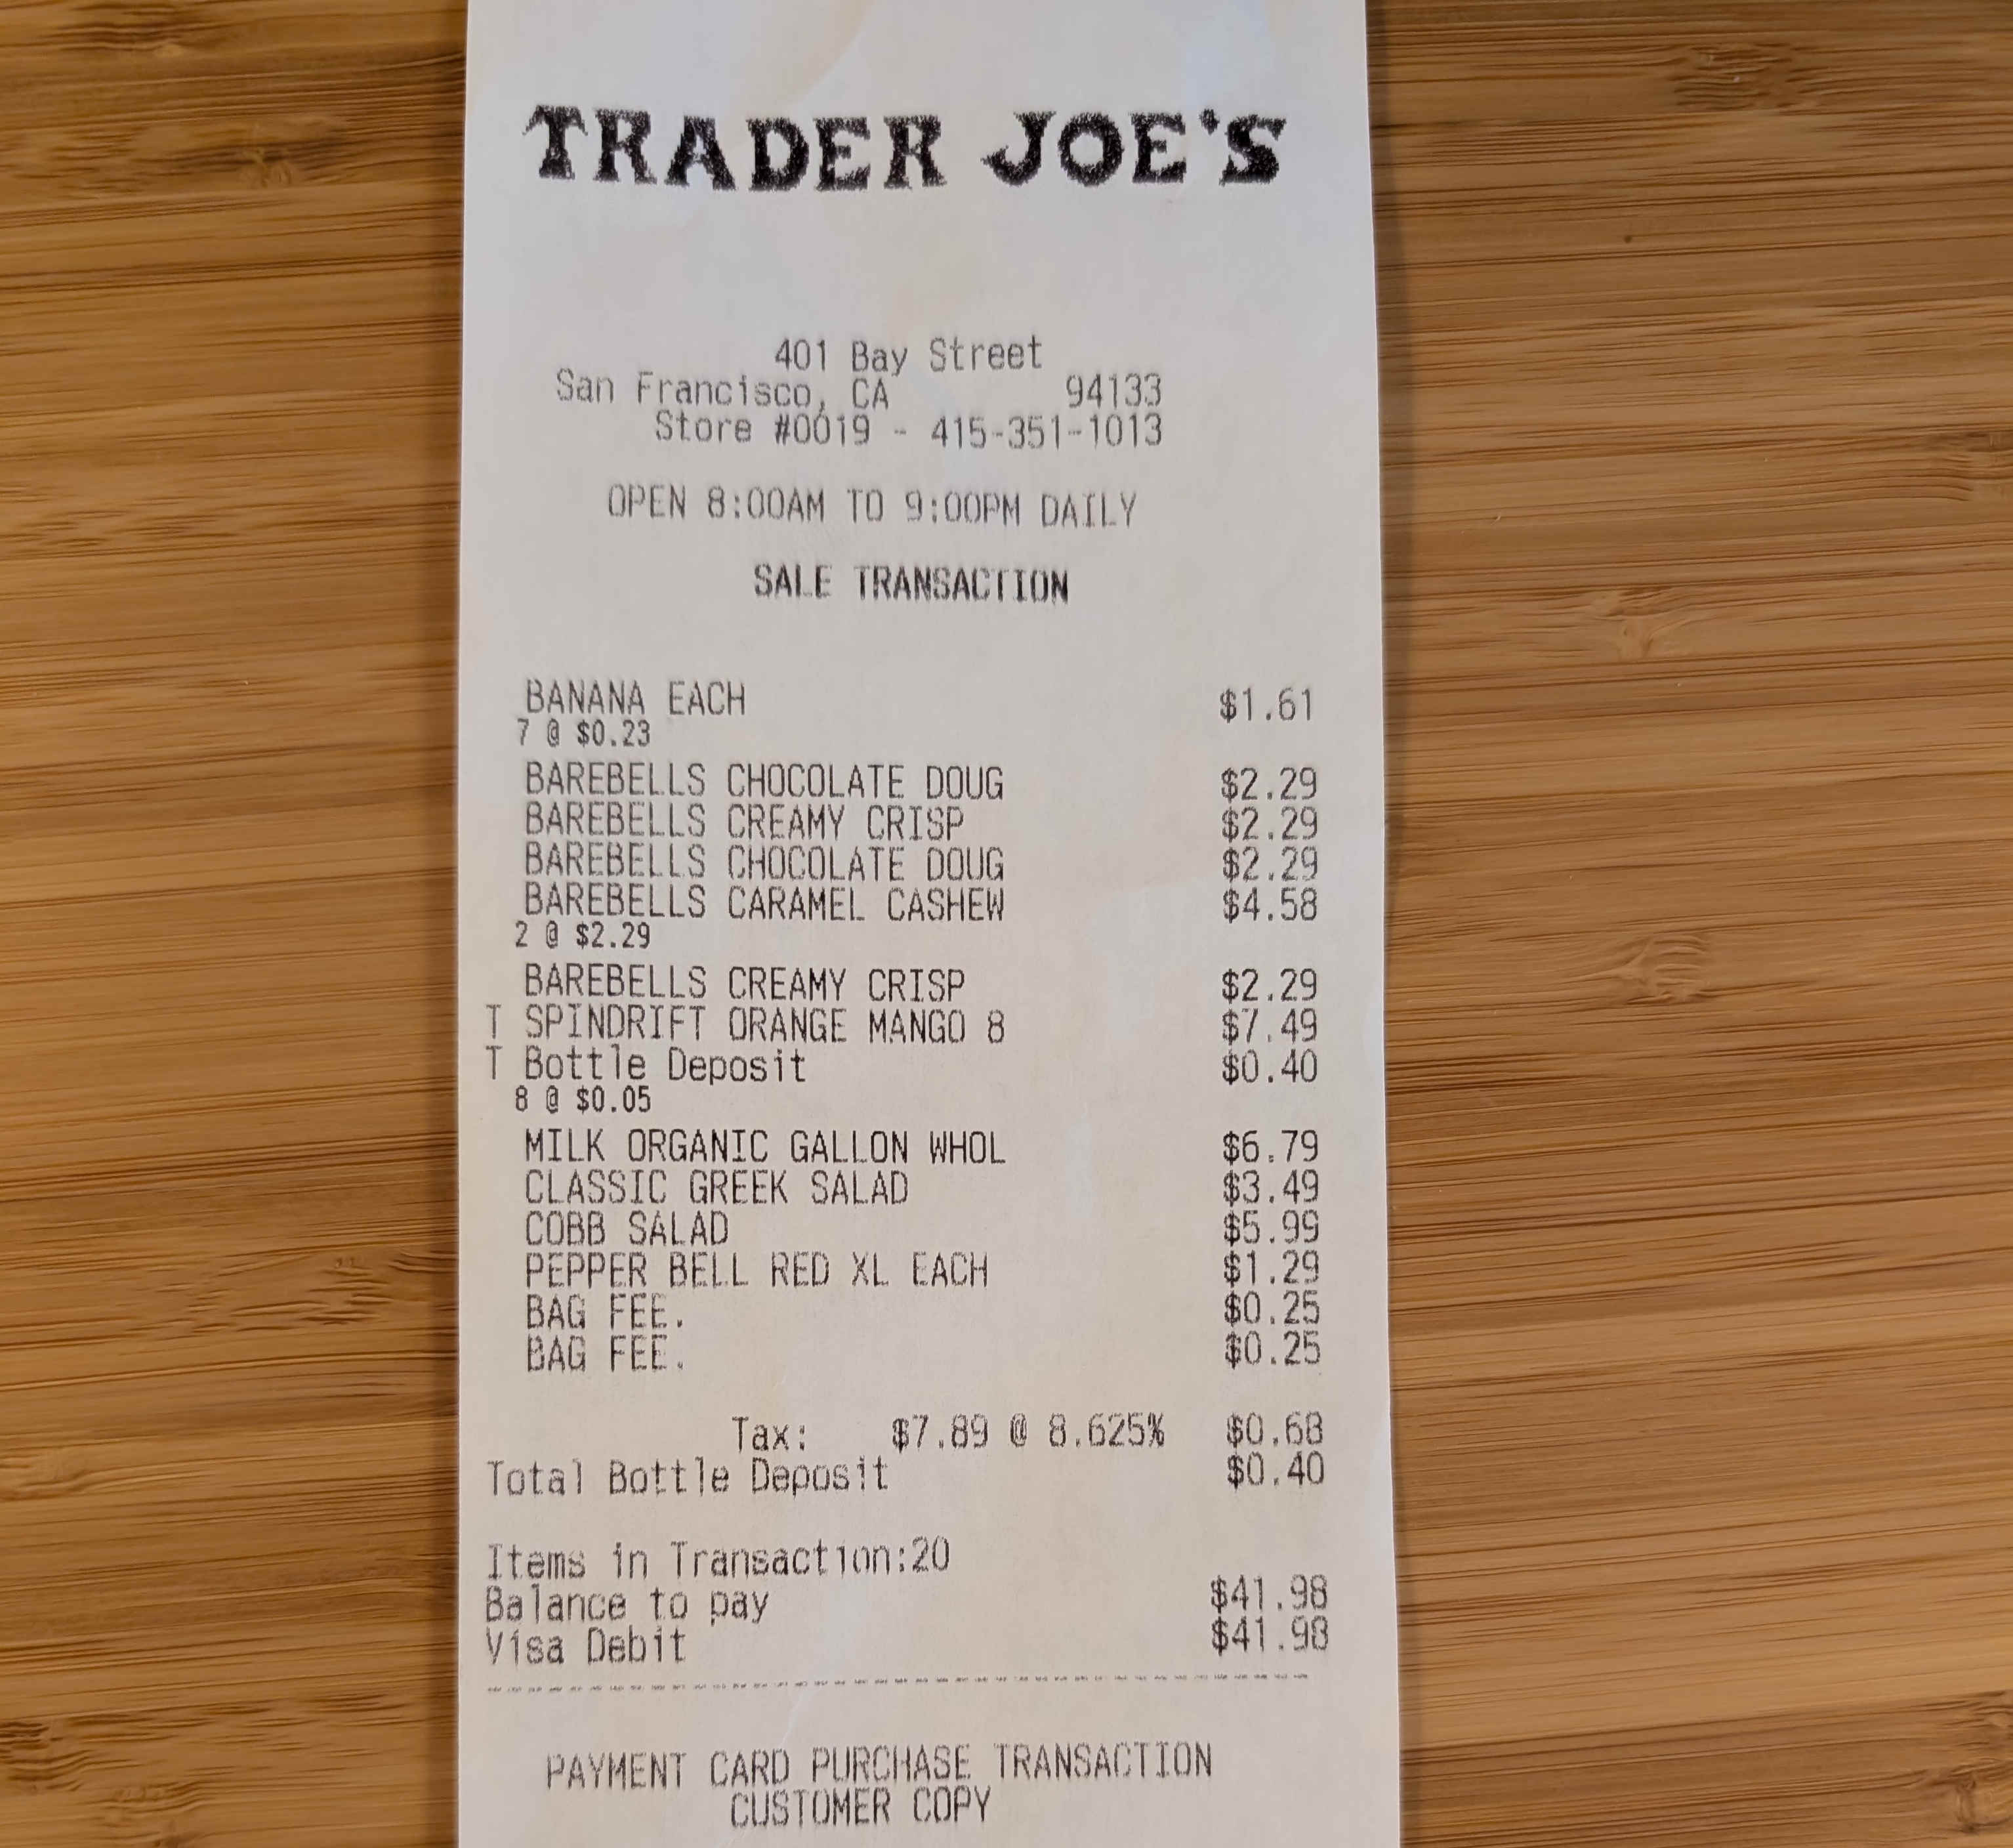
And the result: 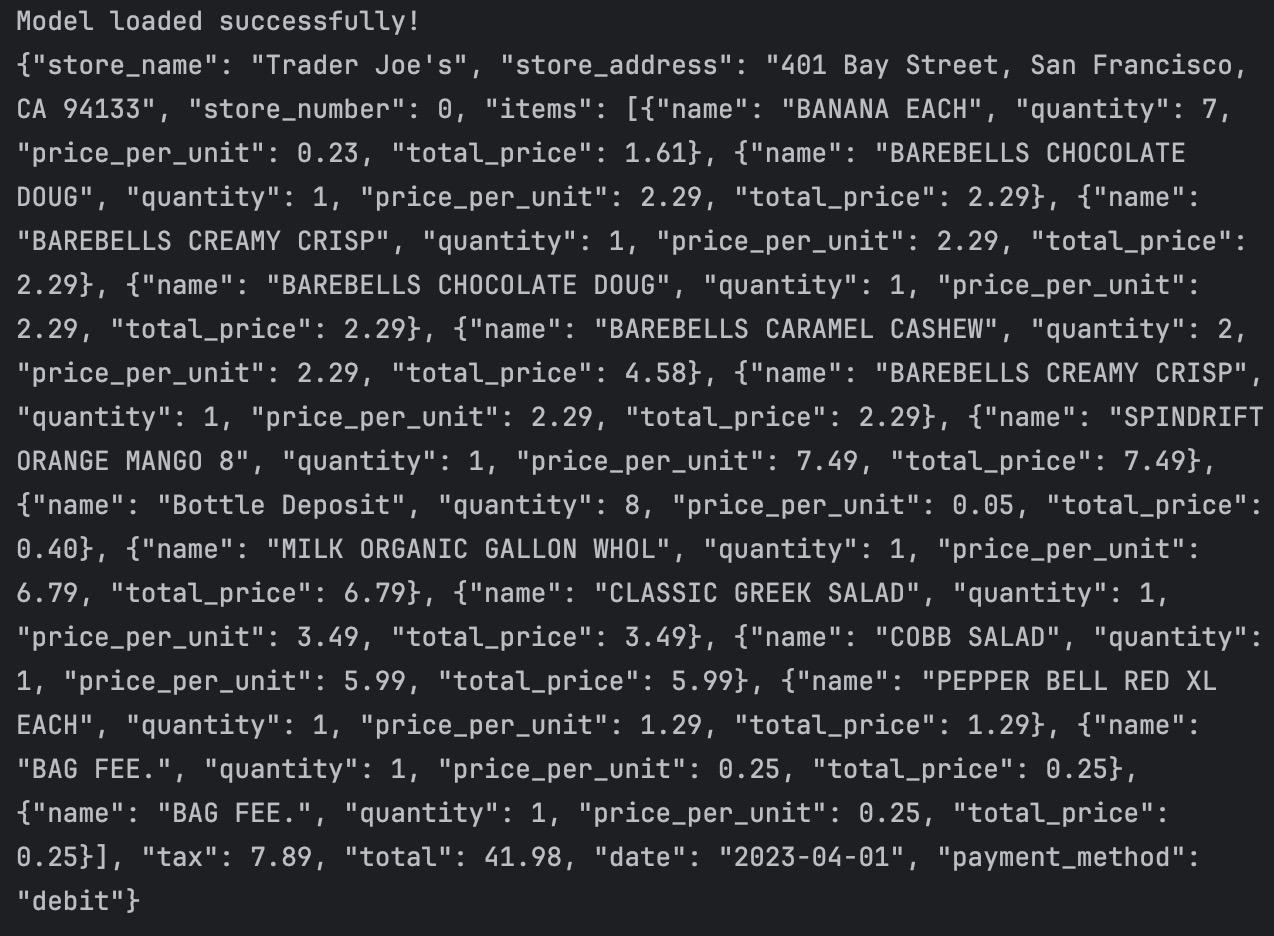
And after that, we want to apply this structured VLM to face description, then we need to adjust the code, what we need to adjust is the message we send to VLM and the facial rules we want the VLM to obey. At the same time, we should provide an example for the VLM to let it understand what is the prompt actually mean more specific.
Thus, we adjust code to:
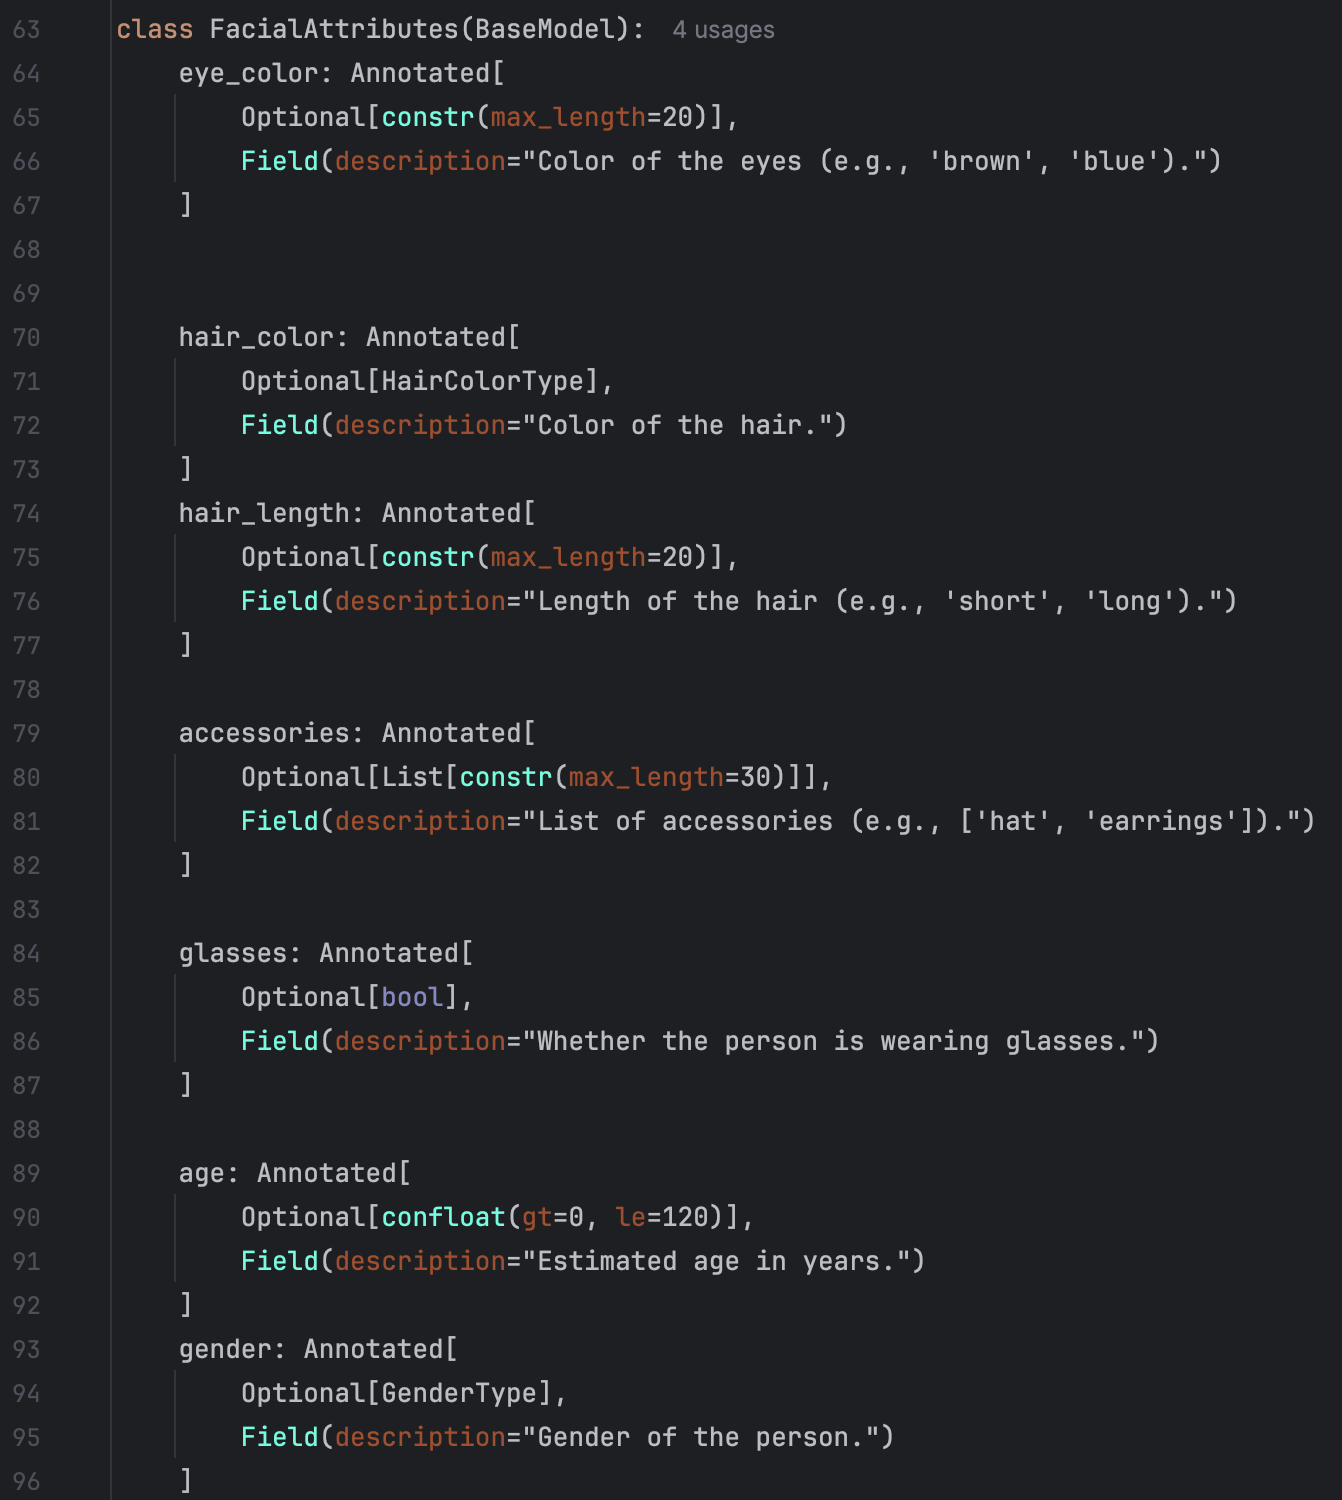
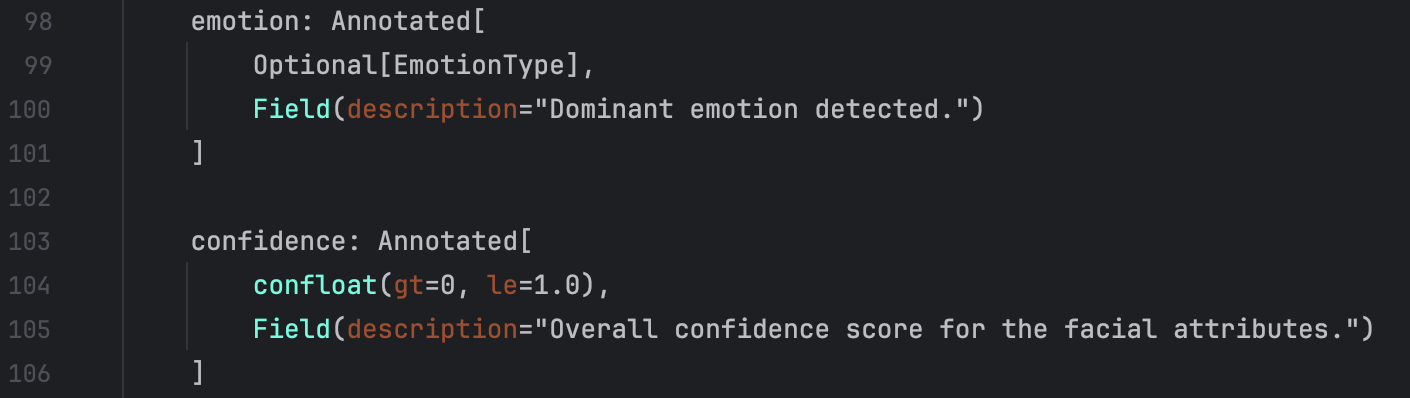
Defination of facial attributes: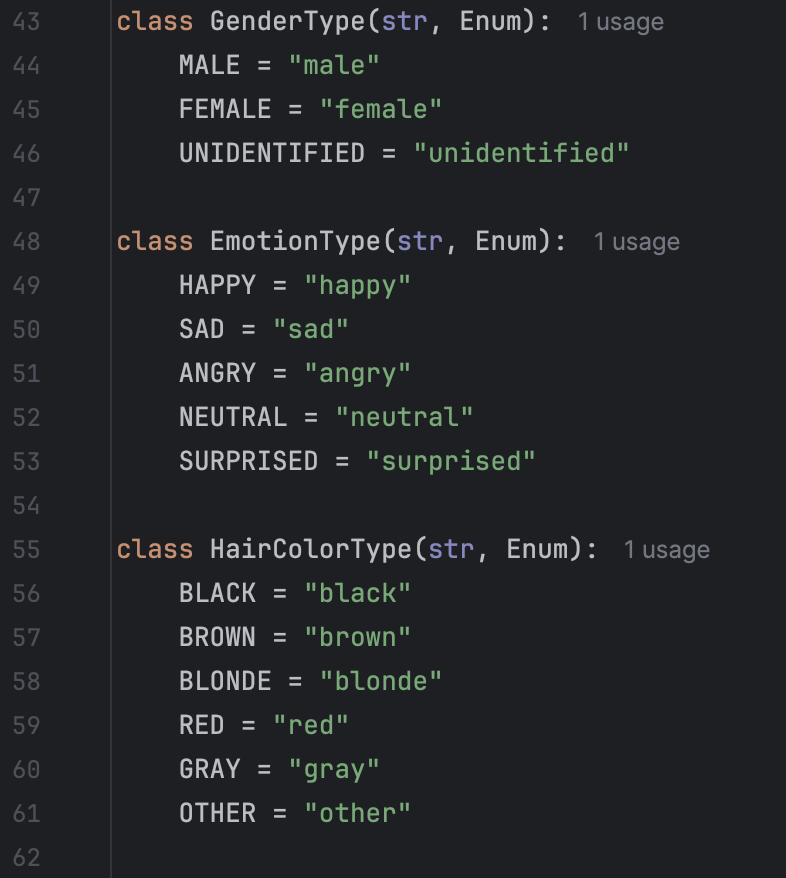
Message: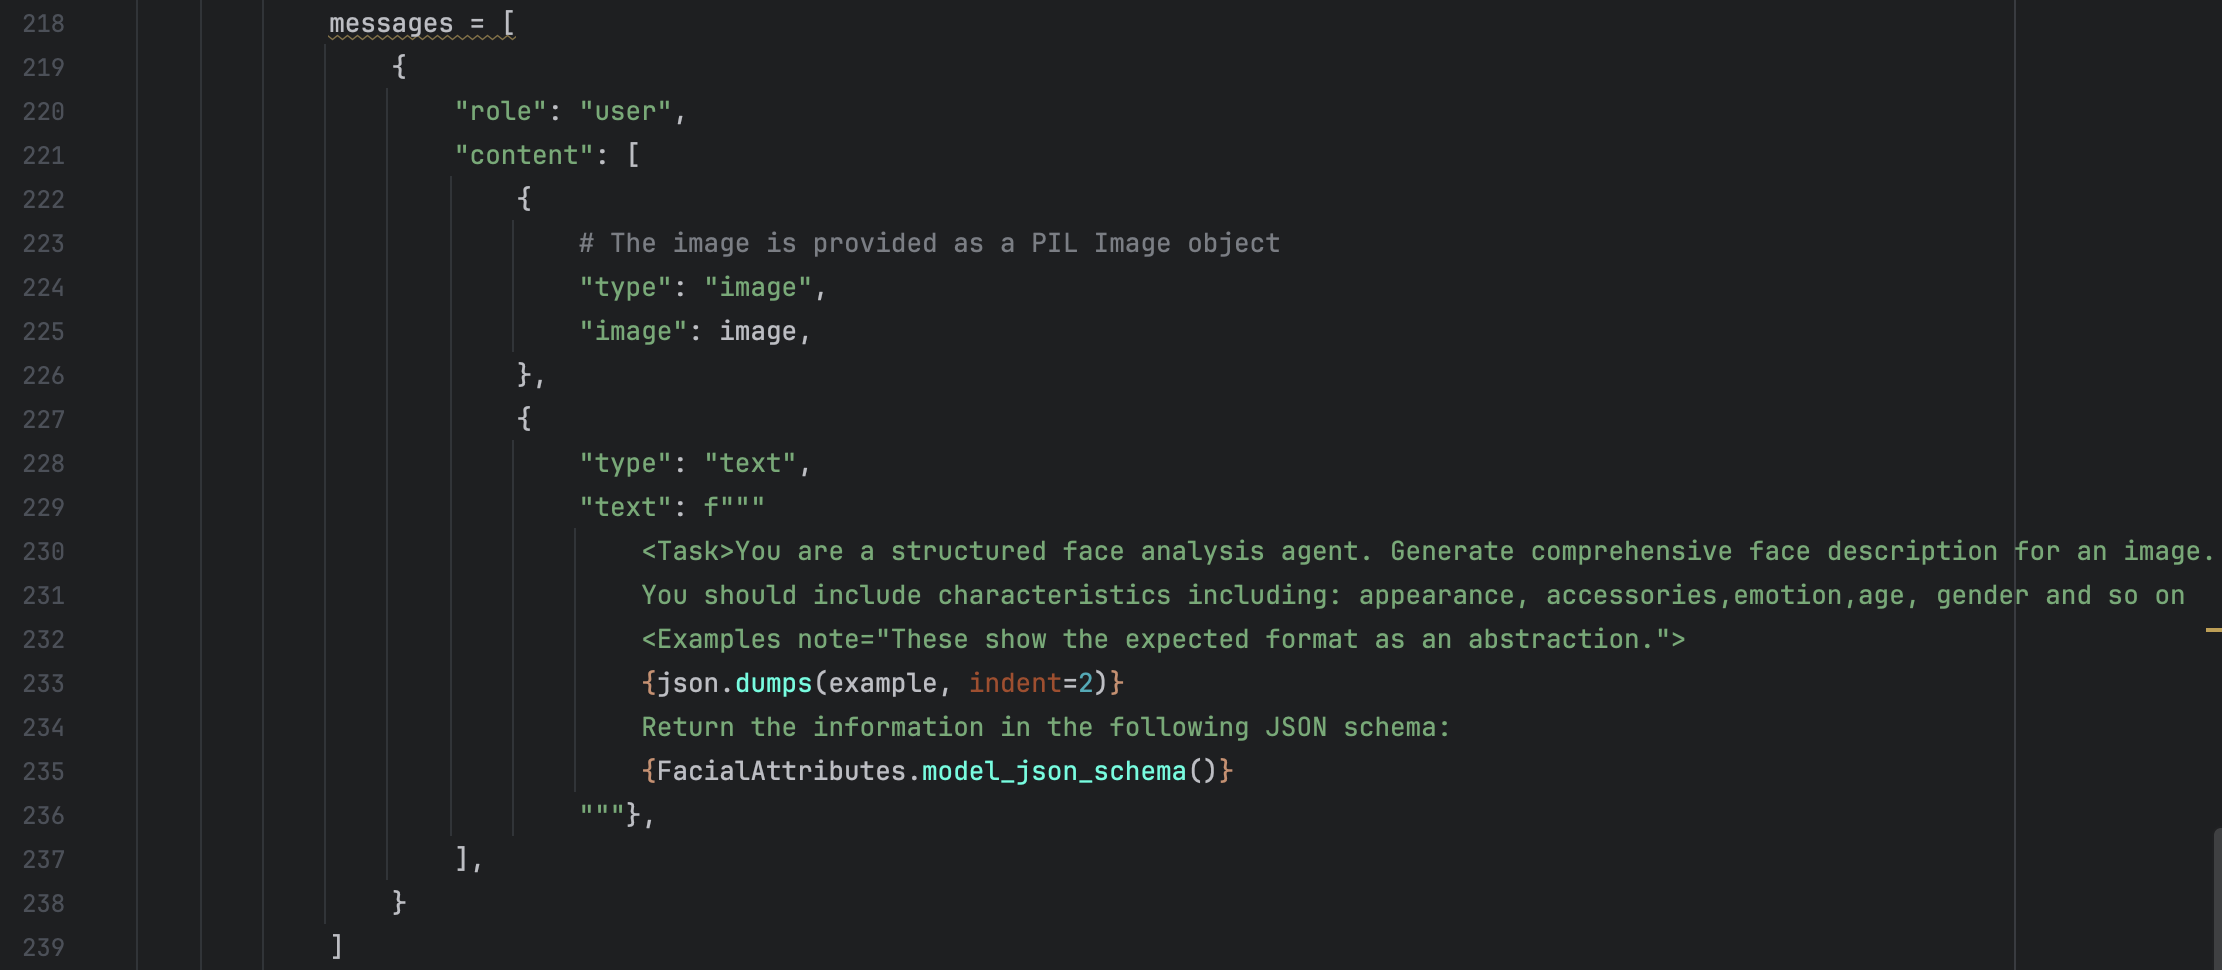
Example for VLM: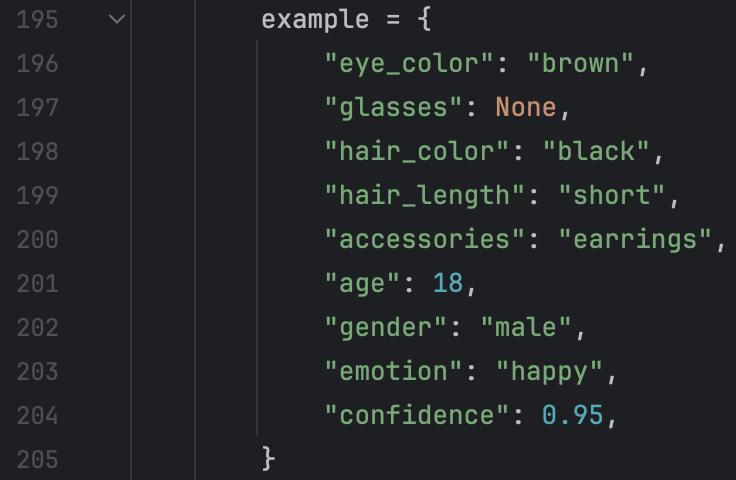
After that, we run the code and the results are shown below:
Original image: 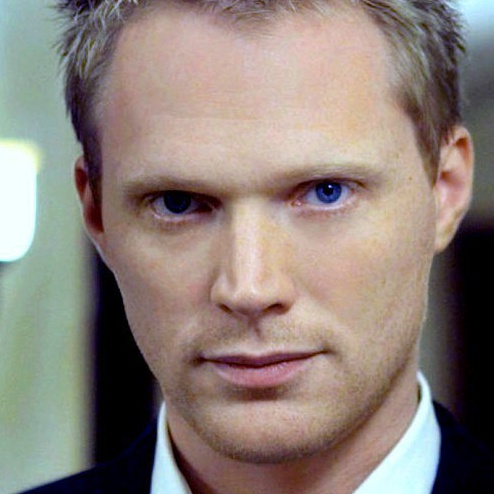
And the result: 
We can acknowledge that the face analysis result are adhered to our defined rules.
We then test the result on multi-images. My initial approach was just changing image’s path to the image folders’ path and then doing relevant easy adjustment to the code. However, by this way, I encountered a problem:
prev_state = self._guide_states[hash(tuple(self.tensor_adapter.to_list(gen_ids[:-1])))] KeyError: 5132355756197510034
I think that the reason for this is because Qwen does not support serveral image input one time, it can only process single image every time.
So I tried another way: I use model = outlines.from_transformers(tf_model, tf_processor) for every image in the folder. By this way, I solved the problem.
Then the result are like this: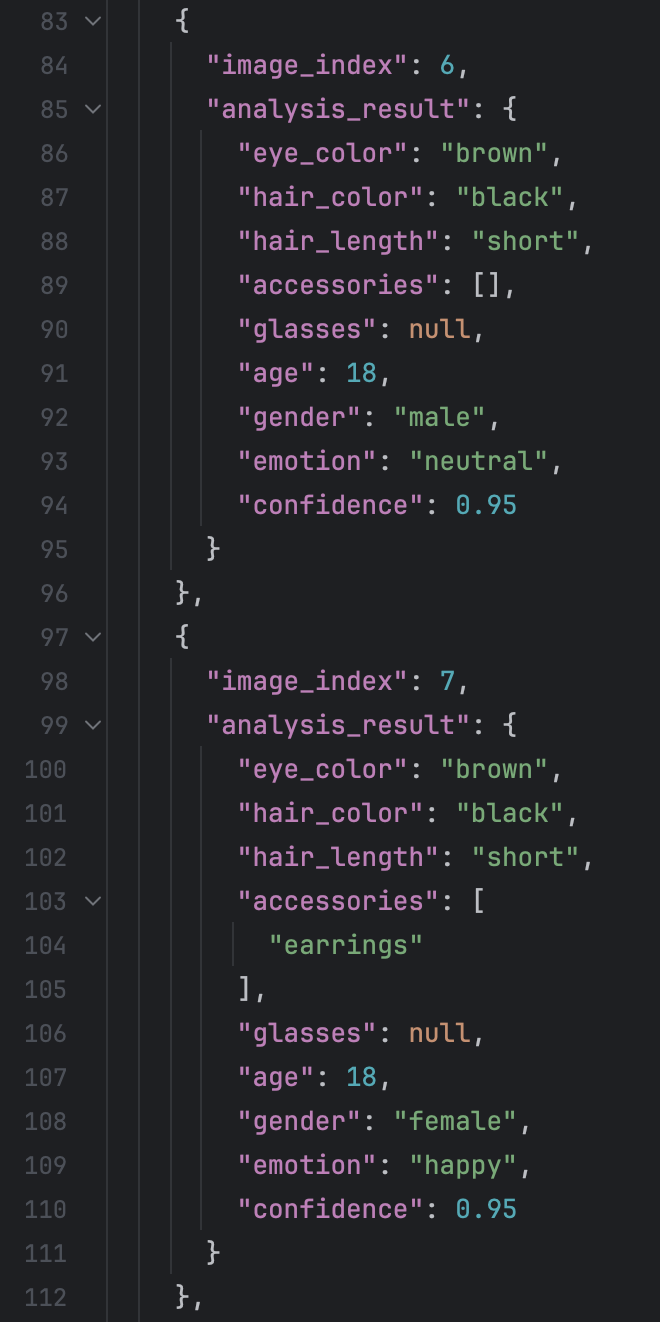
I tested around 100 images there, it is really exciting to find that all the output are adhere to the rules. But what disappointed me is that the exact analysis result of the faces are not good. After look throught the entire file, I find that it is very likely that the “accessories” attribute has value “earrings”, but actually in the picture, it does not have earrings. I think the there are few reasons for this. The first reason is the incapability of Qwen. The another is that the example we give has value “earrings” in attribute “accessories”.
However, the example we give is only text, it does not have corresponding image. And there is another problem: the content of the result are not so good, meaning that there are a lot of circumstance where the description of the face are inaccurace or wrong.
For the first problem, what we want to do is actually adding few-shots to Outlines.
The basic idea are like this: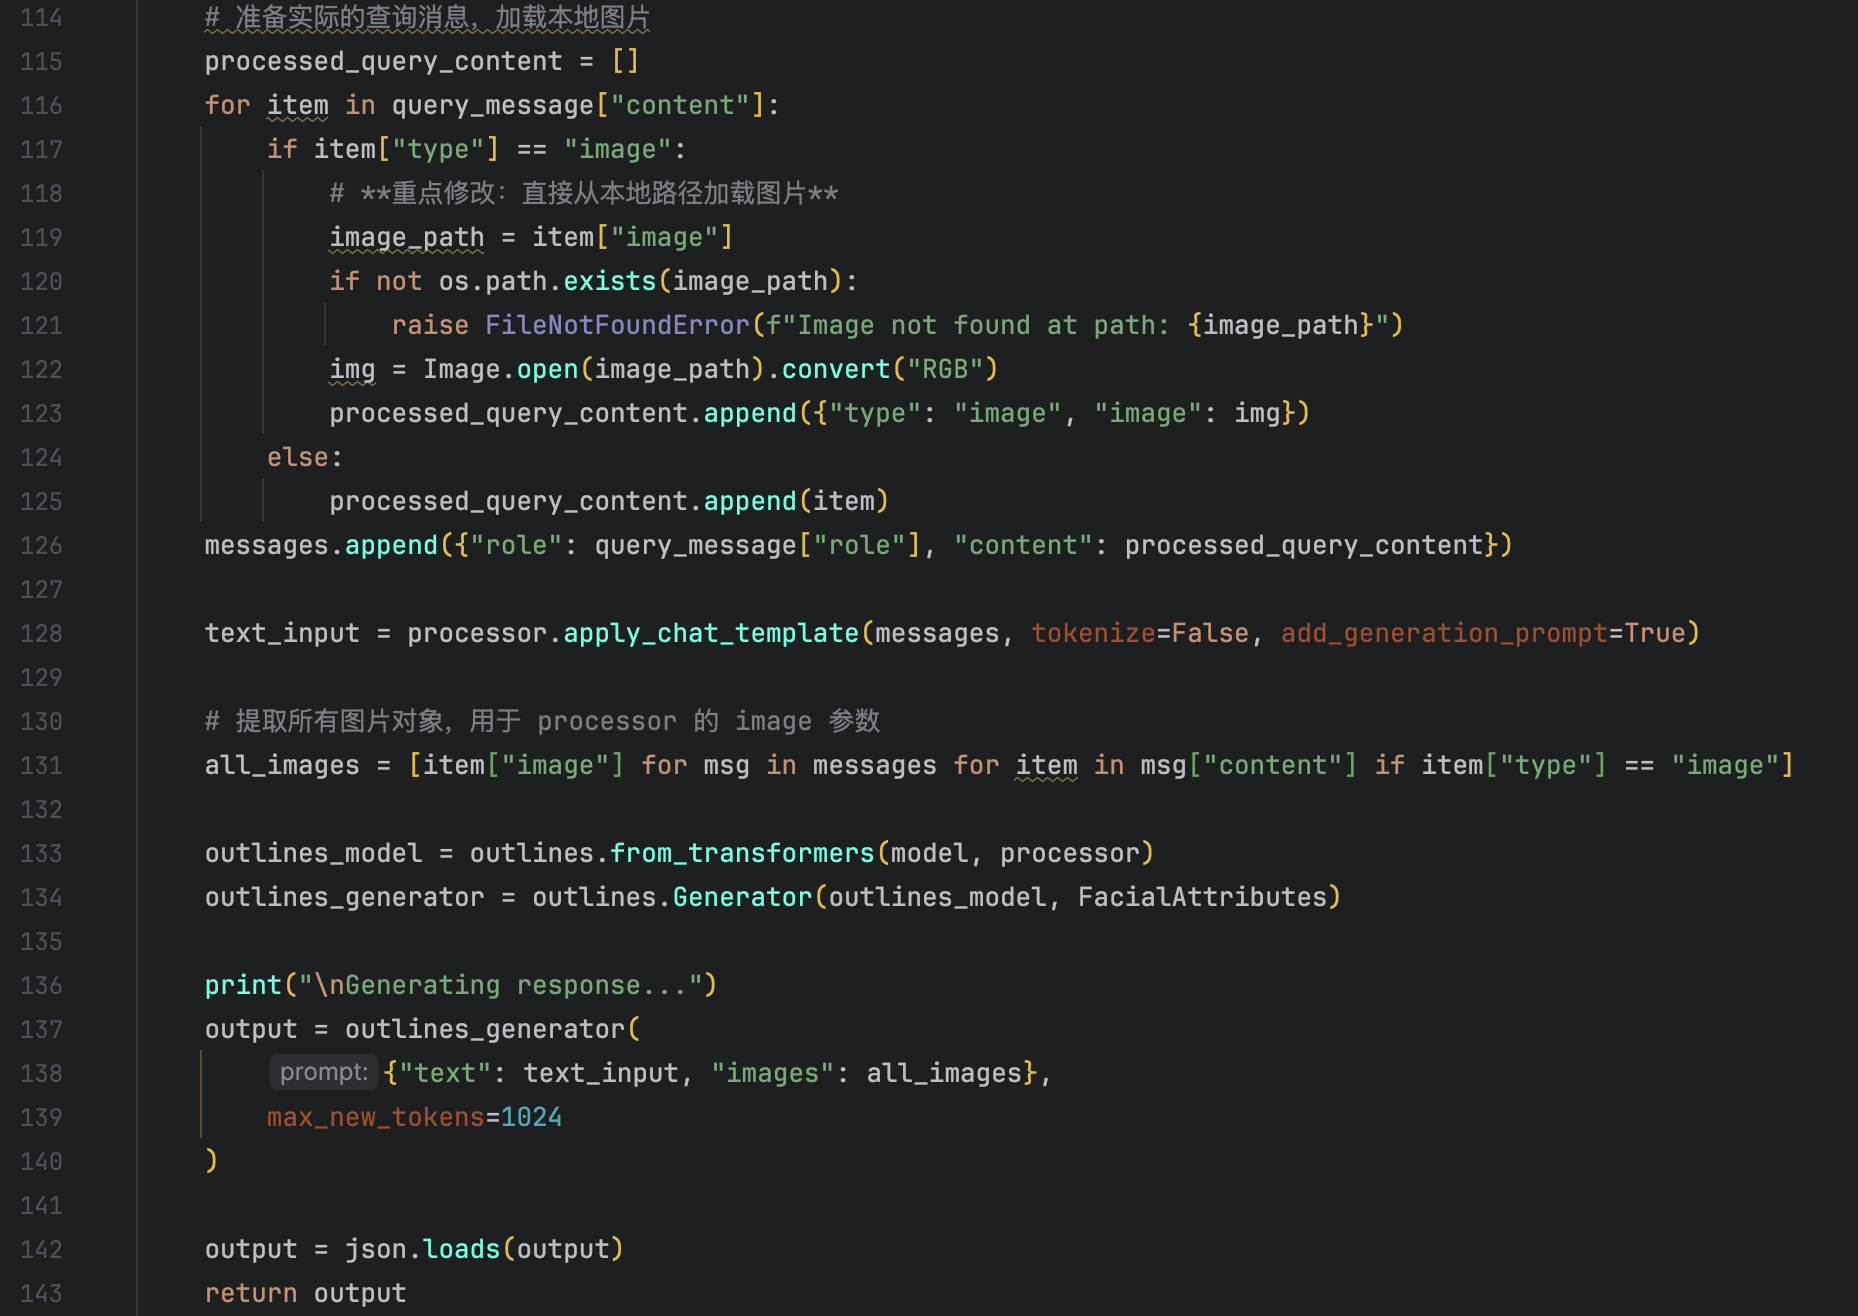
We provide two images to VLM one times: one as the example image and the other as the query image. So how can we justify that these few-shots have taken effect?
We first provide the VLM with few-shot, Facial attribute and check the result. The prompt are like this:
The result are like this:
We can see that the description are sturctured. But we have no idea of whether the few-shot have taken effect, the output are structured even there are only Outlines facial attribute. The goal of this step is to vertify that the few_shot will not bias the right answer.
For the second step, we only provide VLM with few-shot examples. The prompt:
The result:
We can see that the description are still sturctured. Thus vertify that the few-shots there can take effect and in other words, VLM have learned the output strucutre from the examples.
Finally, we provide VLM the few-shot without structured output we only give it example: “user”:”describe the face in the image” “assistant”:”The face in the image has …”. The … there means the descriptive sentence of the face in the image. The prompt:
The result:
We can see that by this way, the output are not adhered to our rules.
By these three steps, we can see that the few-shot we added here take effect. And it is effective.
Then for the second problem, we should use large model for query. Since that the previous model I use are Qwen2.5-7B, there I want to use Qwen2.5-32B, so I need to use GPU which has larger VRAM. So I rent the A800 on AutoDL. However, when I use A800, there always encounter a problem: RuntimeError: expected self and mask to be on the same device, but got mask on cpu and self on cuda:0 No matter the size of the model.
Using sglang:
We first need to install all the packages needed to run the SGLang API:
conda create -n sglang python=3.11
pip install “sglang[all]>=0.5.0rc0”
After the configuration of conda environment, we need to activate sglang api:
For single GPU, we can use this:
python3 -m sglang.launch_server –model-path Qwen/Qwen2.5-VL-7B-Instruct –host 0.0.0.0 –port 12345
For multi GPUs, we can use this:
python3 -m sglang.launch_server –model-path Qwen/Qwen2.5-VL-7B-Instruct –host 0.0.0.0 –port 12345 –tensor-parallel-size 4
There the tensor-parallel-size is the number of GPUs we want to use.
Here let’s take the face description as an example:
- Start the sgalng port:
run the command in the command line:
python3 -m sglang.launch_server –model-path Qwen/Qwen2.5-VL-7B-Instruct –host 0.0.0.0 –port 12345 –tensor-parallel-size 4 –grammar-backend xgrammar
It is better to specify the structured output method we want to use, though the default method it XGrammar, I still specify it in the command for readability。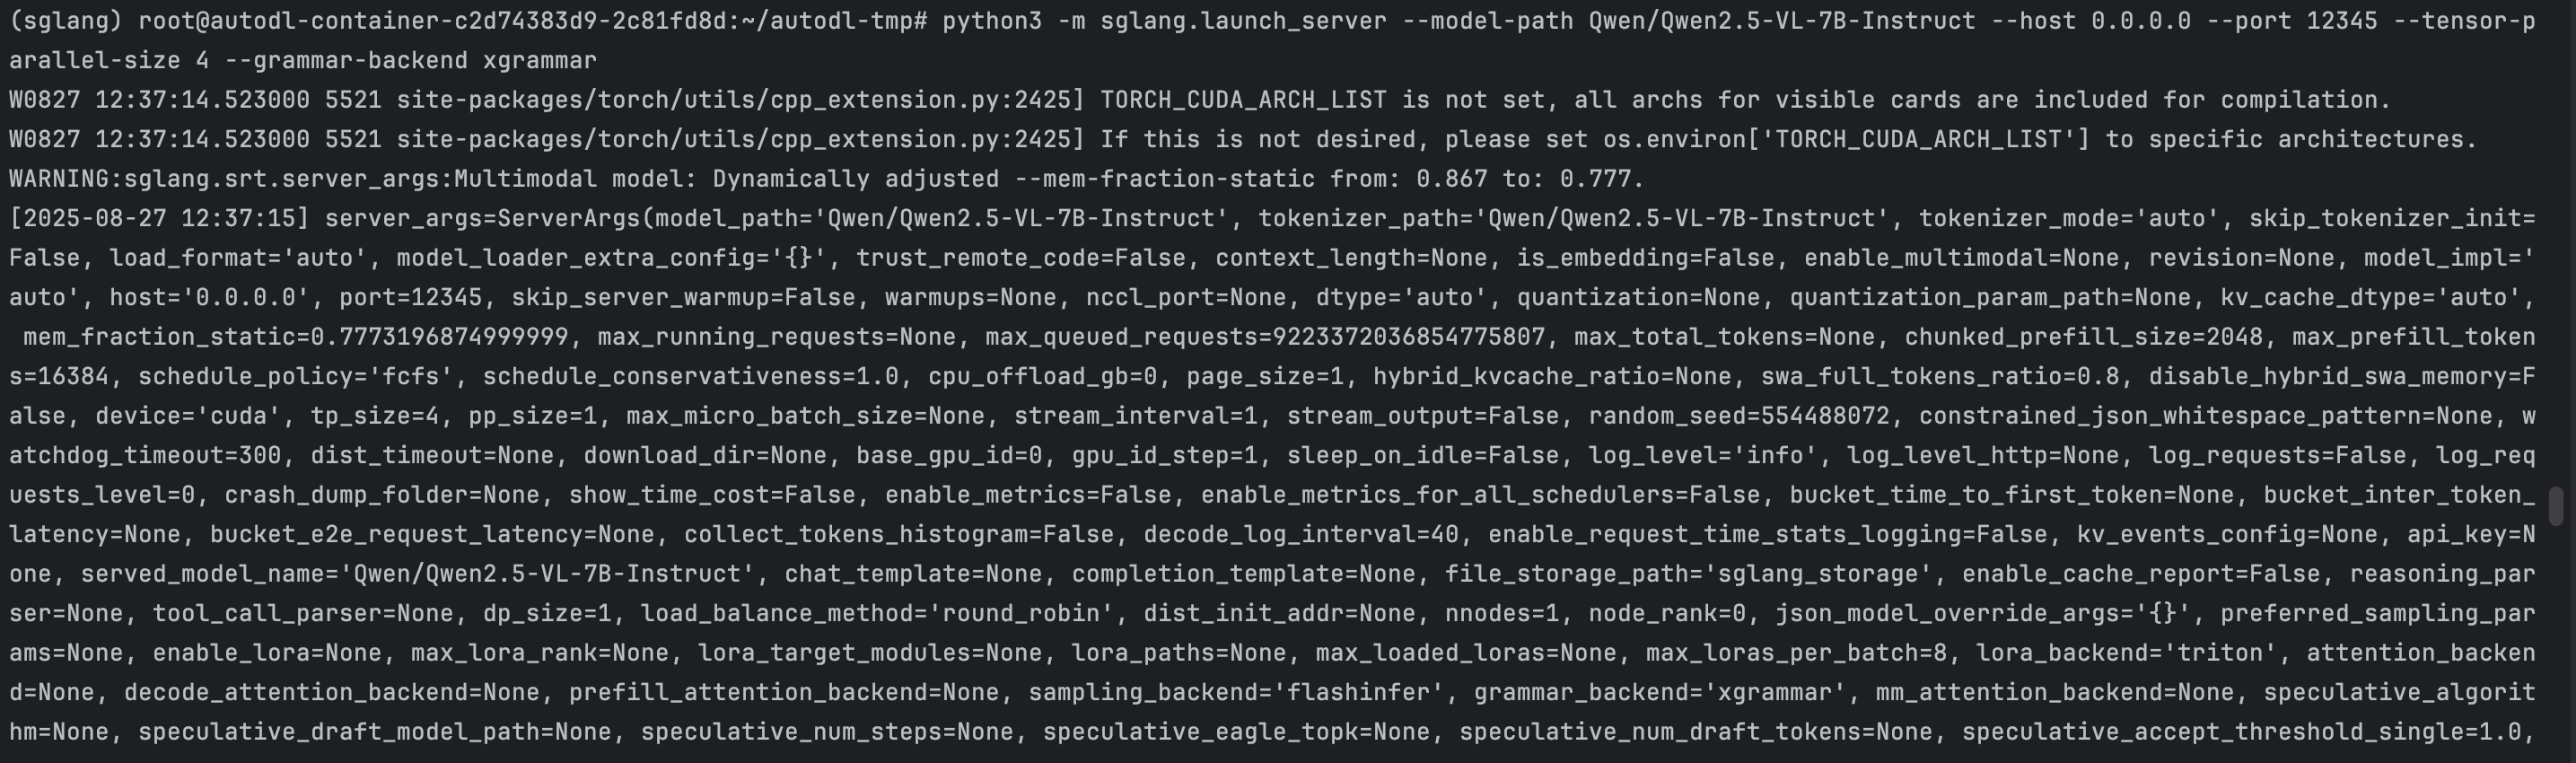
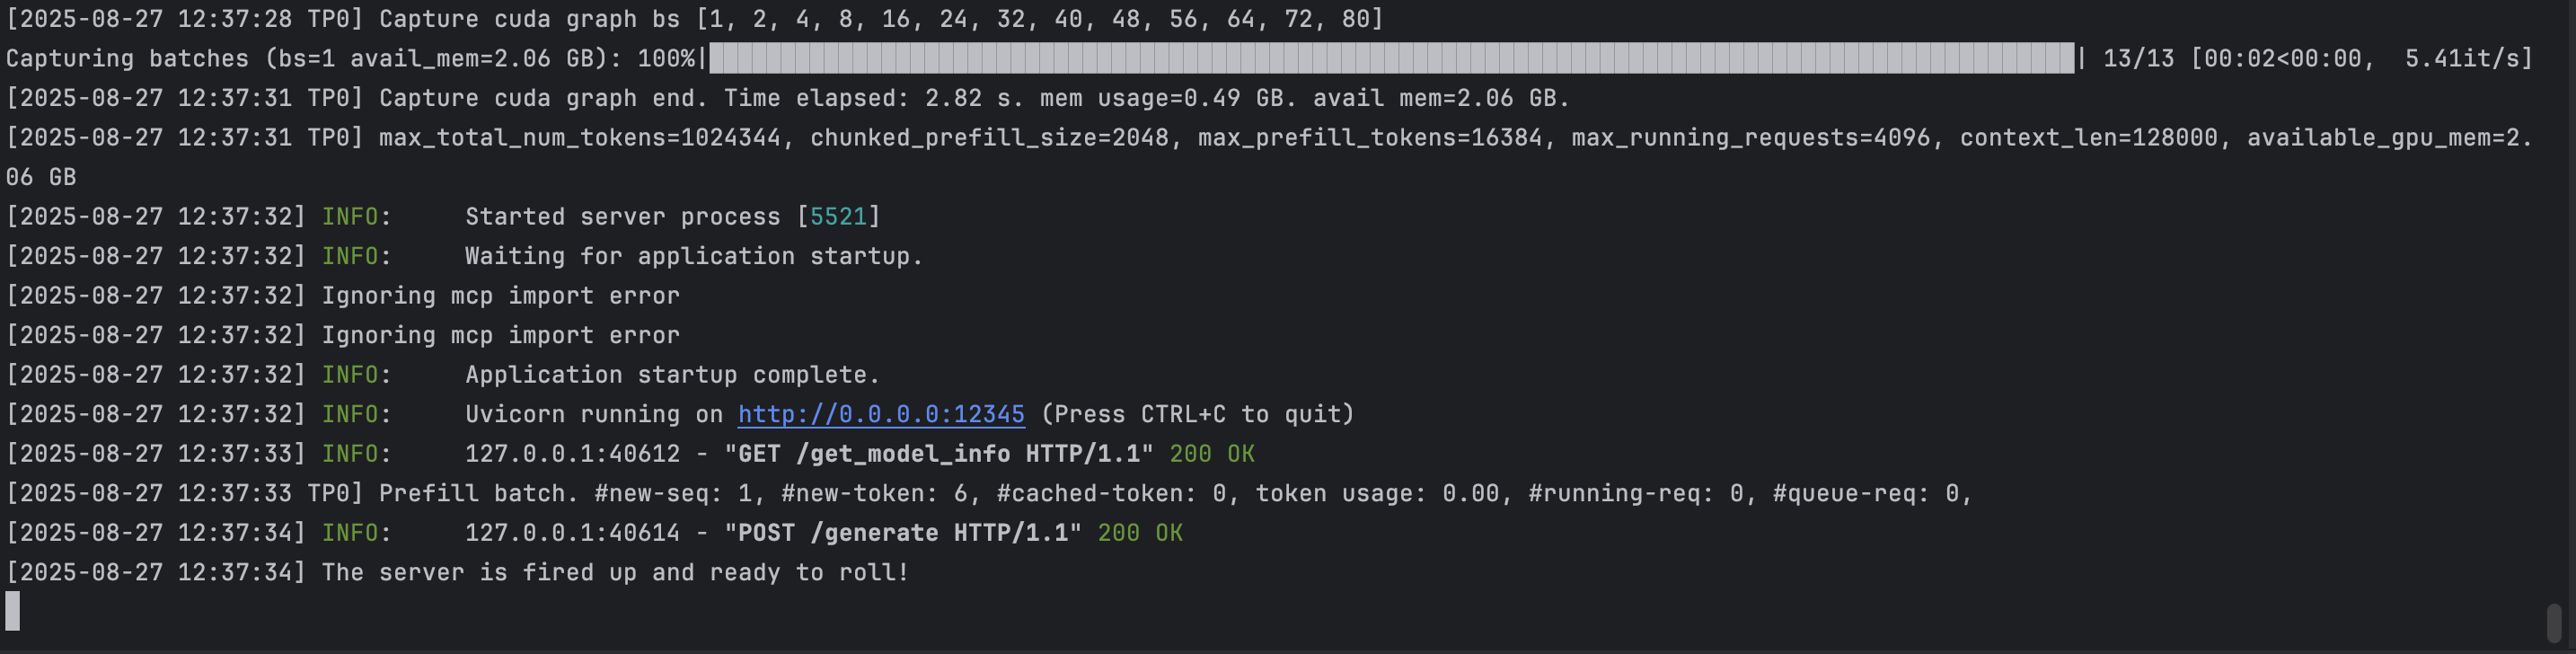
- Run the code that use SGLang API:
We first test the sturcture of the output: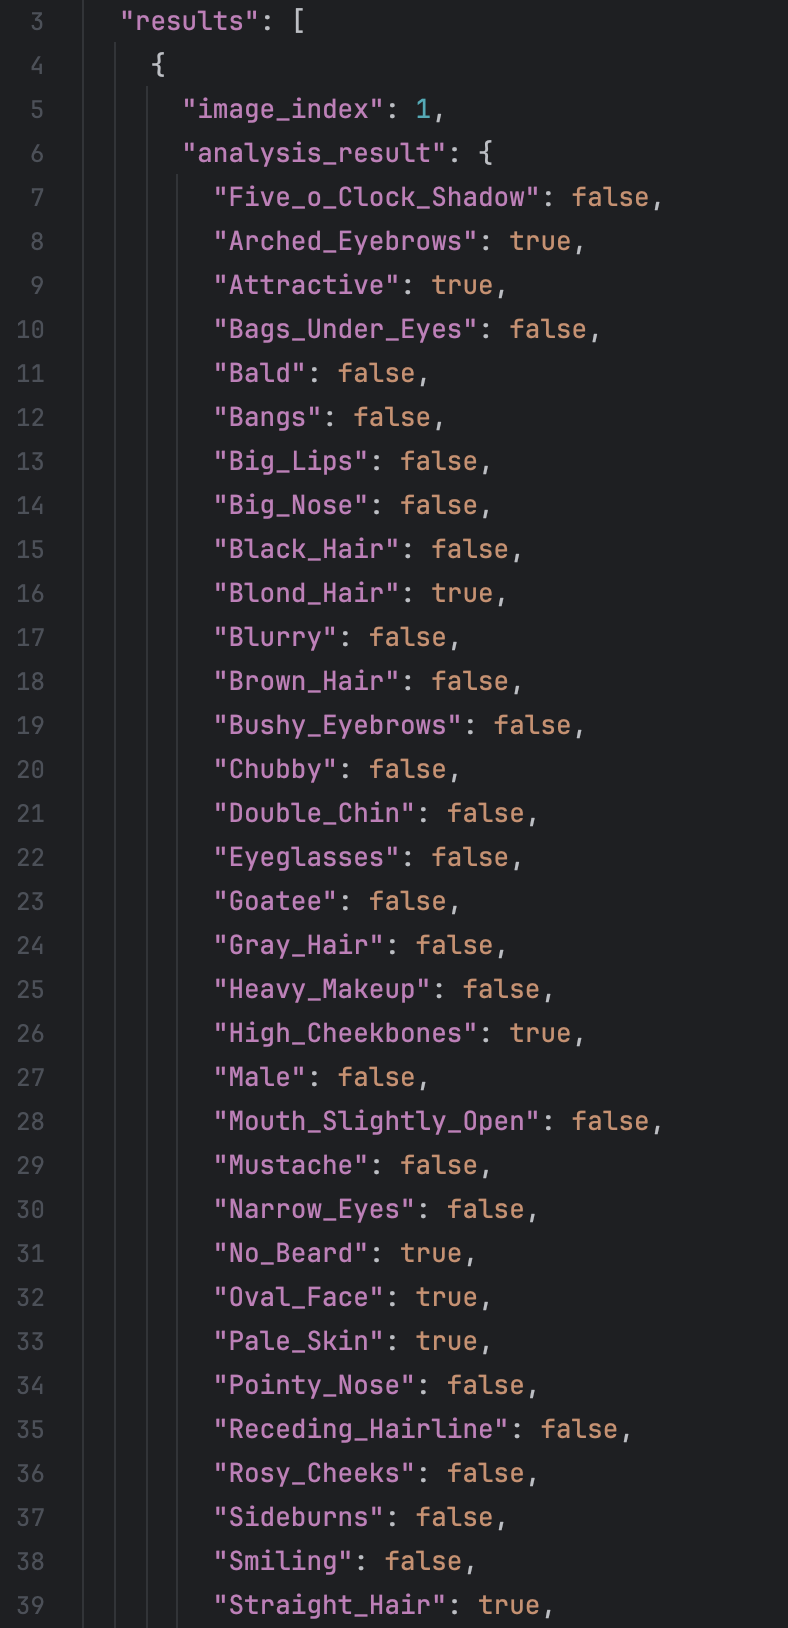 It is clear that by this means, the output of VLM are structured.
Then we test the Qwen-2.5VL-32B ability in the facial attribute description
We use CelebA dataset here. The CelebA dataset has more than 200K face images and has 40 annotated attributes label for each of the face image. Here,we first test 100 images. The result are like:
It is clear that by this means, the output of VLM are structured.
Then we test the Qwen-2.5VL-32B ability in the facial attribute description
We use CelebA dataset here. The CelebA dataset has more than 200K face images and has 40 annotated attributes label for each of the face image. Here,we first test 100 images. The result are like:
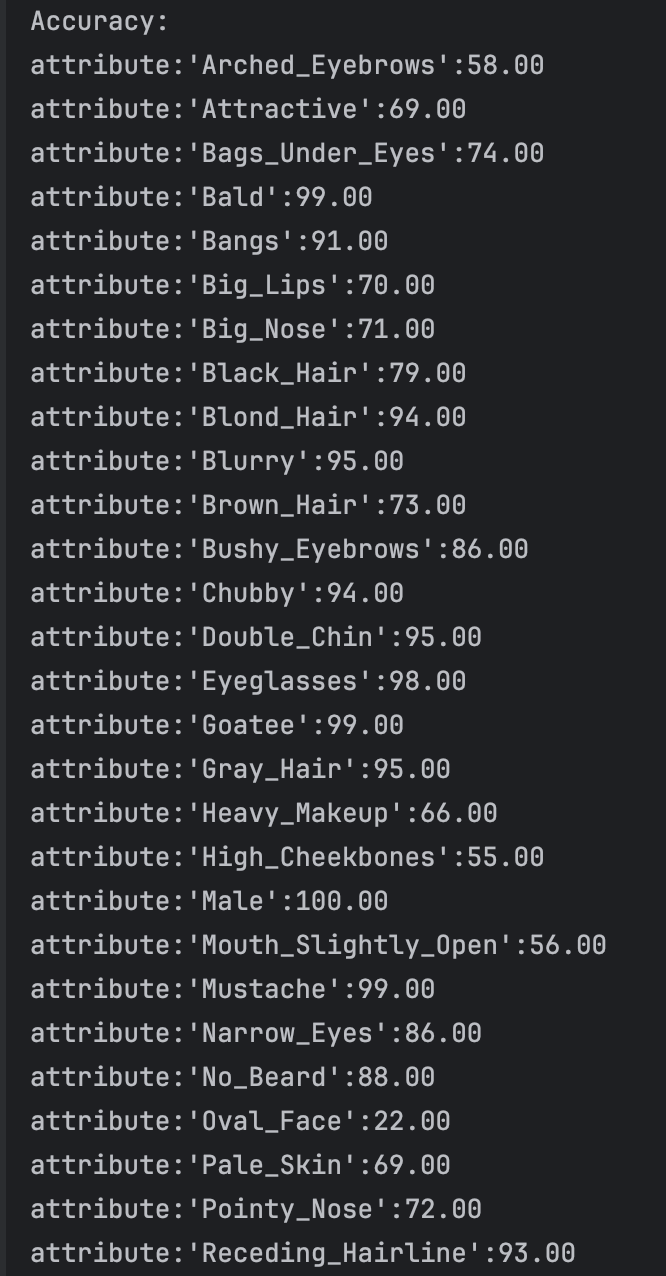
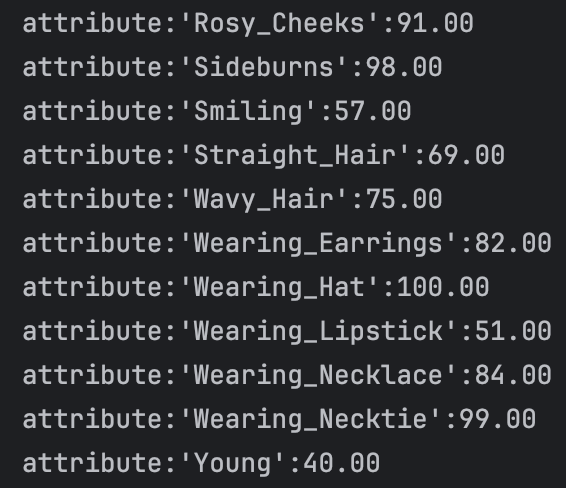 There we have looked through some face dataset: CelebA, MAAD-FACE, FFHQ. We use CelebA to test the result of VLM. For the dataset CelebA, it has 220559 face images and each of the images has annotated 40 bool attributes, like black_hair, eyeglasses and so on. We test the VLM face understanding ability on 5000 images and the result are like:
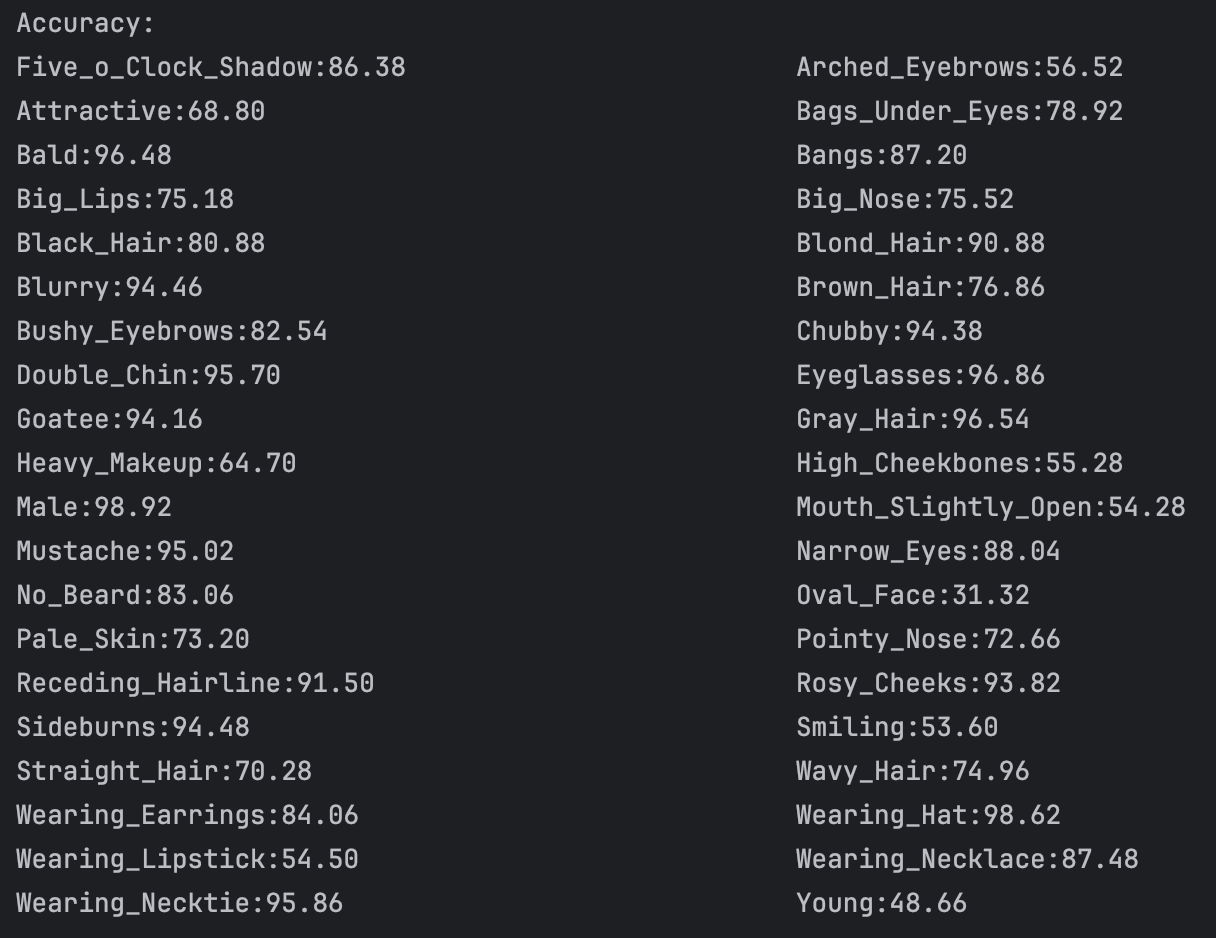
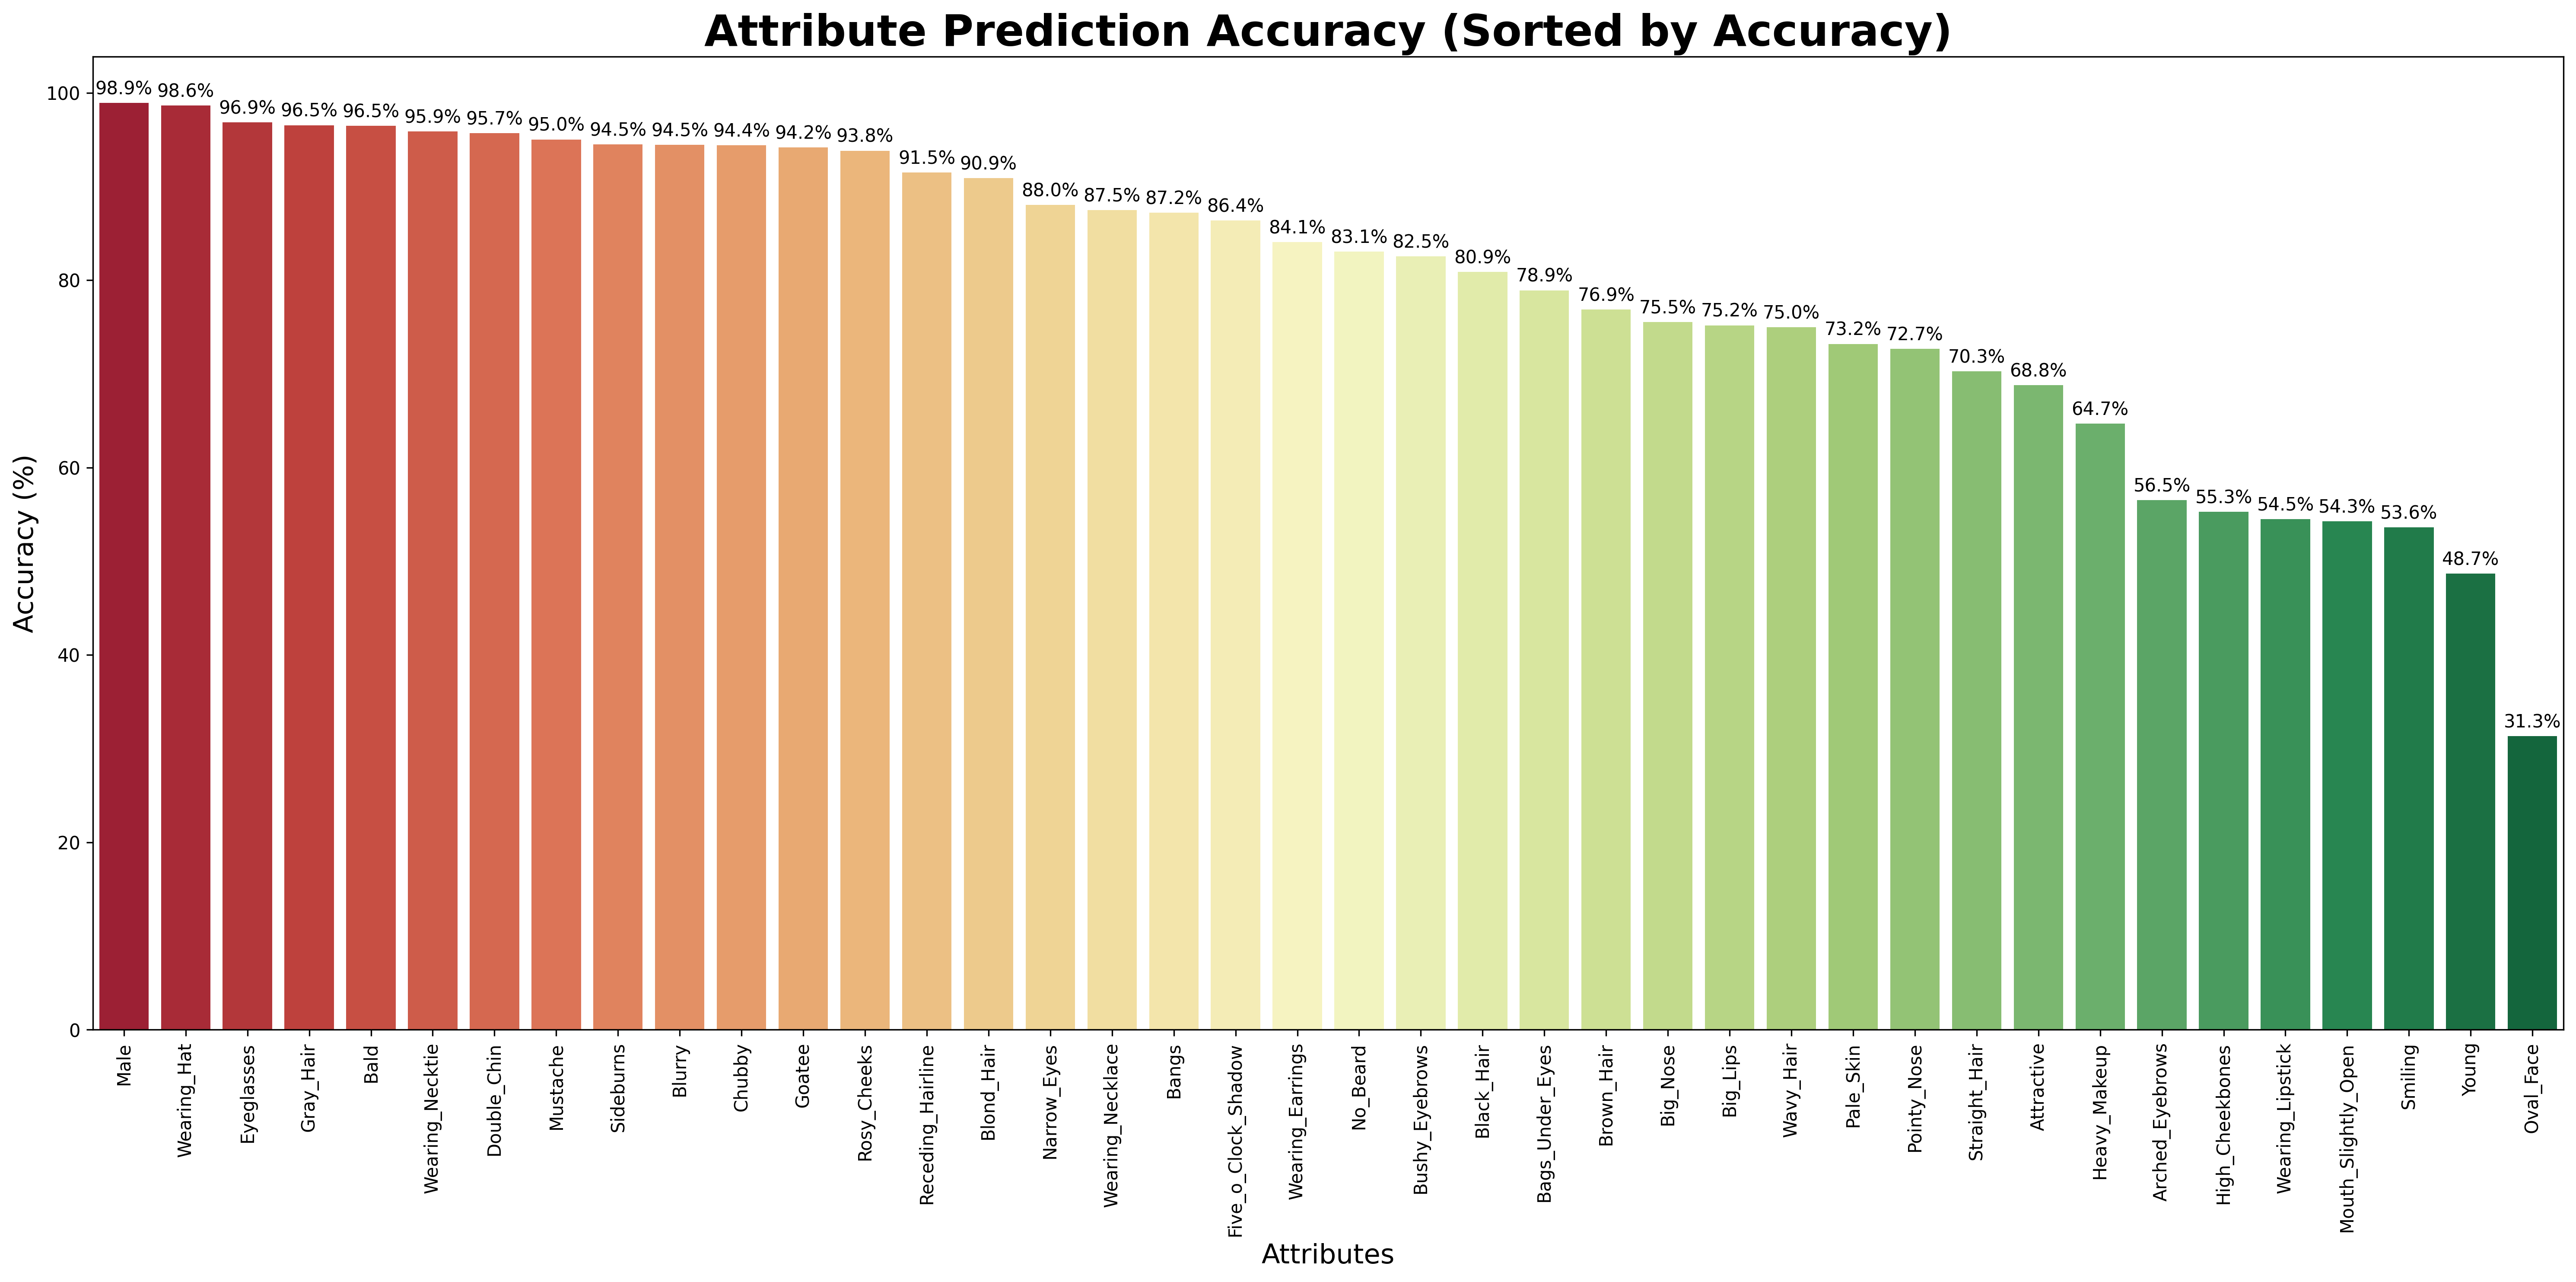 We can see that for the binary classification of the facial attributes, the VLM can achieve a relative good performance. However, what we want is multiple classification. However, according to my survey, I have not found any dataset that have facial attributes annotated as multiple classification. And this is, I think, a gap we will fill in our later works. Then I tried to use the similar attributes in the CelebA dataset to test the understanding ability of VLM, for example, black hair, brown hair, blond hair and grey hair. There I test four attribute: hair color, hair style, facial hair and accessories. I firstly defined the hair color and hair style select a single value from the possible result and facial and accessories form a list of possible result. After I changed the structure constrains of the output, I ran the model and it occured a problem:
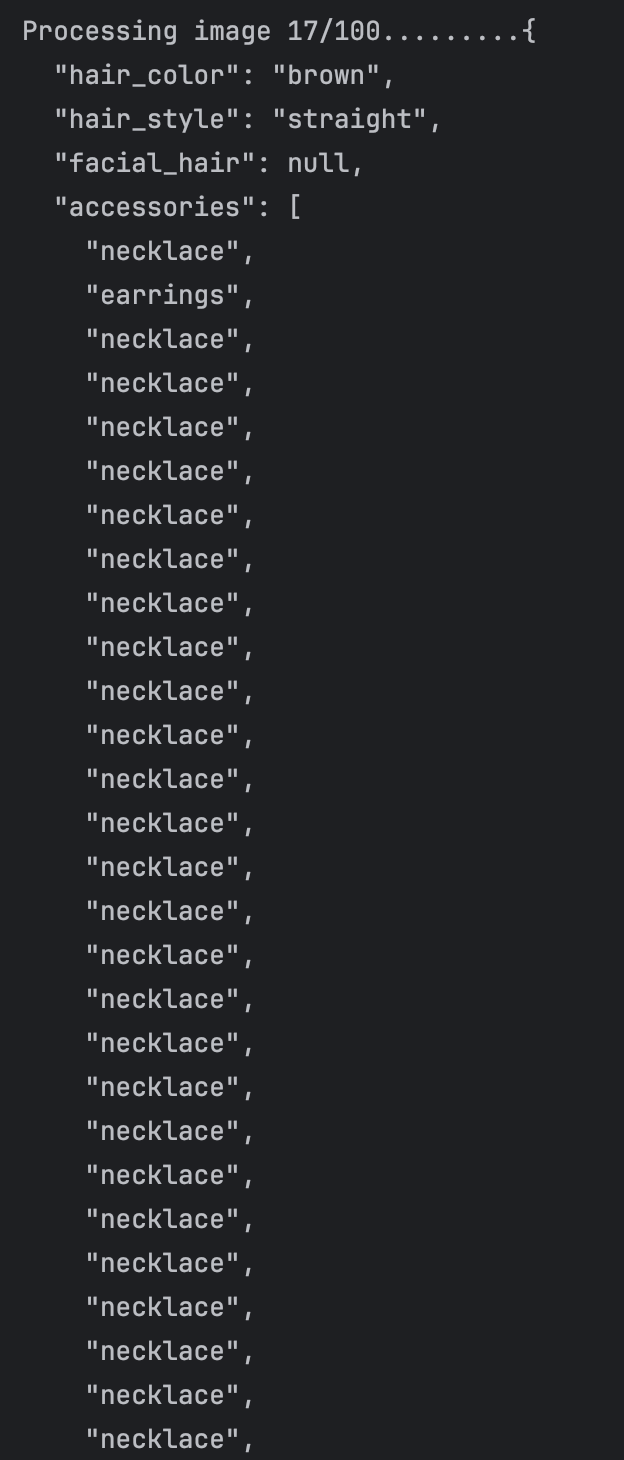 I thought that the error is caused by that we predefined the max token of the VLM output, and the VLM run into endless loop of "necklace". So my solution was constrain the length of list of each attribute. After the correction, the result are like this:
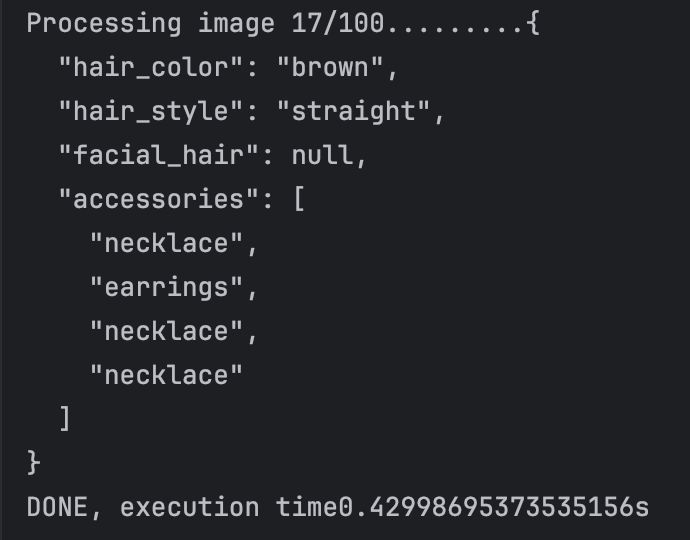 The endless loop problem solved. And what I do further is to combine the repulicated attributes into one.
OpenAI API:
First I want to say something about Git clone. After I used VPN and tried to git clone a project. It always report timeout. What we need to do is configuring git proxies:
git config –global http.proxy “127.0.0.1:port”
git config –global https.proxy “127.0.0.1:port”
The port can be seen at the “proxy” of the system settings.
Then it come to the call of OpenAI API. we need to add
import os
os.environ[“http_proxy”] = “http://127.0.0.1:port“
os.environ[“https_proxy”] = “http://127.0.0.1:port“
to the front of the code.
And we can succeed.